Rotting or damaged fascia boards rarely get noticed until they’ve already caused real problems: sagging gutters, water infiltrating the roof edge, or visible decay creeping toward the rafter tails. Understanding fascia board replacement cost before you’re in the middle of a repair helps you budget accurately, compare quotes fairly, and make smarter material choices for your home’s long-term protection. If you’re looking at the full picture of what keeps your roofline healthy, learning how fascia fits into the broader scope of roof edge care is a solid first step.
Here’s what this guide covers:
- What fascia boards do and why they matter for your roof and gutters
- A full breakdown of 2026 replacement costs by material and project scope
- The five factors that most significantly affect your final price
- A practical comparison of the most common fascia materials
- Signs that your fascia needs immediate attention and what happens if you wait
What Fascia Boards Actually Do and Why Replacement Matters

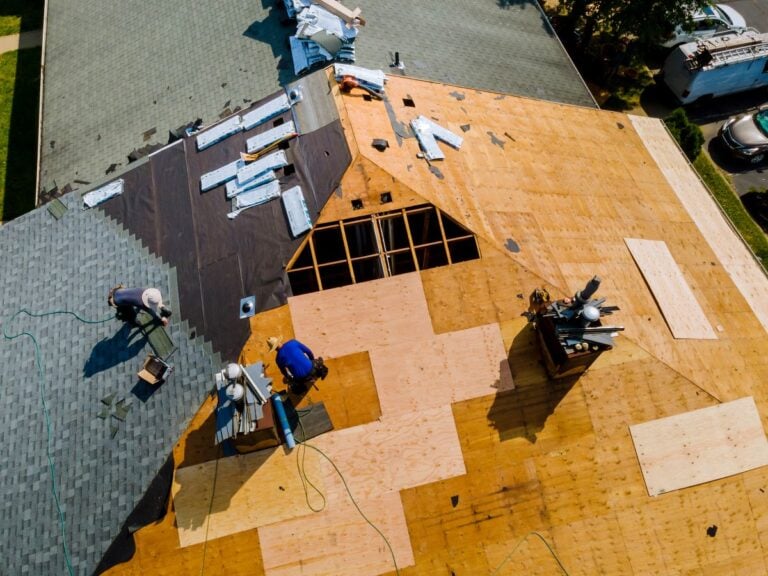
Fascia boards are the horizontal trim boards that run along the lower edge of your roofline, capping the ends of your roof’s rafter tails. They sit directly behind your gutters, and in most cases, your gutters are bolted straight to them. That means the structural integrity of your entire gutter system depends on the condition of the fascia underneath. A soft, rotted fascia board cannot hold gutter weight adequately, and when gutters pull loose or sag, water drainage stops working, which sends water directly down your foundation walls and against your home’s siding.
Beyond gutter support, fascia boards close off the exposed rafter ends at the roofline, blocking moisture, insects, and small animals from entering the space between the roof deck and the soffit. When fascia fails, that gap becomes an open invitation for water infiltration that can reach the roof deck, rot out the sheathing, and eventually require a far more expensive repair than a simple fascia replacement would have been. For homeowners in Burke and surrounding areas, where seasonal humidity and freeze-thaw cycles accelerate wood deterioration, keeping fascia in good condition is a genuine structural priority rather than a cosmetic one.
Here is why getting fascia replaced promptly matters:
- Gutter stability: Gutters mounted to soft or rotted fascia will pull away from the roofline, allowing uncontrolled water discharge that can erode landscaping, flood basements, and damage foundations.
- Roof edge protection: Exposed rafter tails without intact fascia coverage are vulnerable to moisture, UV degradation, and pest damage that spreads inward over time.
- Soffit preservation: Failing fascia often allows water to travel horizontally into the soffit system behind it, which can saturate insulation and rot out the soffit panels themselves.
- Curb appeal and resale value: Visibly damaged fascia is one of the first things home inspectors flag, and it signals deferred maintenance to buyers. A clean, well-maintained roofline communicates care and quality.
- Cost containment: Addressing damaged fascia when it’s localized costs a fraction of what repairs cost after the damage has spread to rafters, roof decking, or soffit systems.
5 Factors That Determine Your Fascia Board Replacement Costs
Fascia replacement costs vary widely between projects, and understanding what drives the price makes it easier to evaluate quotes and avoid surprises. These five factors account for most of the variation homeowners see when they start collecting estimates.
1. Material Choice
Material is the single biggest variable in fascia board cost, and choices of material significantly affect the overall cost of fascia board projects through both materials and associated labor. Each material has a distinct price range, maintenance profile, and expected lifespan that should factor into your decision.
Here is what the most common options run in 2026 based on installed cost per linear foot:
- Solid wood: $5 to $10 per linear foot installed. The most affordable option upfront and widely available; wood fascia boards are also the most cost-effective in raw materials at about $1 to $3 per linear foot of lumber, but they need regular maintenance because they are more vulnerable to rot and water damage. Requires paint or stain and periodic sealing to prevent rot. With proper maintenance, wood fascia lasts 15 to 20 years, but in humid Virginia climates, unprotected or neglected wood can fail significantly sooner.
- PVC or vinyl: $7 to $14 per linear foot installed. Lightweight, moisture-resistant, and easy to work with, with materials typically costing about $5 to $9 per linear foot and offering better durability with less maintenance than wood. Vinyl doesn’t rot and doesn’t need painting, but it can become brittle in extreme cold and may discolor with prolonged UV exposure. Generally lasts 25 to 30 years.
- Aluminum (wrapped or solid): $10 to $22 per linear foot installed. Highly durable, rust-resistant, and low maintenance, with materials typically costing about $8 to $20 per linear foot and making it the most durable, lowest-maintenance common option. Aluminum can be wrapped directly over existing wood fascia in some situations. When installed correctly, aluminum fascia can last 40 years or more.
- Fiber cement: $10 to $20 per linear foot installed. Dense, fire-resistant, pest-resistant, and stable in varied climates. Holds paint well. Heavier than wood or PVC, which adds labor time and cost. Lifespan of 40 or more years with proper installation.
- Composite or engineered wood: $8 to $16 per linear foot installed. Made from wood particles and plastic resin for better durability and weather resistance than traditional wood. Low maintenance and long-lasting but can cost more upfront than wood.
2. Linear Footage of Your Home’s Roofline
Fascia runs along every edge of your roofline, including all sides of the home and along dormers, bay projections, and any other roof planes. A typical single-story house has approximately 150 to 250 linear feet of fascia, and average replacement often falls in the broader $1,050 to $3,300 range depending on materials and the home’s specific roofline needs, while larger two-story homes or homes with complex rooflines can exceed 400 linear feet.
Total project cost for an average single-story home with 200 linear feet runs between $1,200 and $4,000 depending on material and labor rates. Larger or more complex homes can reach $5,000 to $8,000 or more. In Burke and surrounding areas, the colonial and split-level home designs that dominate many neighborhoods often fall in the 200 to 300 linear foot range.
3. Extent of Underlying Damage
If your fascia boards have been deteriorating for some time, the damage often extends beyond the boards themselves. Rafter tails, roof sheathing at the edge, and soffit panels can all be compromised by moisture that saturated through the failing fascia. When underlying framing is rotted, it must be repaired or sistered before you replace fascia properly, especially when old fascia has already allowed moisture deeper into the roof edge.
Rafter tail repair or sister framing adds $200 to $600 per section depending on the scope. If multiple rafter tails are compromised, this can add $1,000 or more to the total project cost. The only way to know the full scope is a thorough inspection once the old boards are removed, which is another reason to address failing fascia early before the damage travels upward into the structure.
4. Home Height and Accessibility
Single-story homes with straightforward eave access are the baseline for most fascia pricing. When fascia replacement requires working at two-story height or higher, contractors need more time, more safety equipment, and in some cases scaffolding or lifts. Labor commonly runs $6 to $20 per linear foot or about $75 to $120 per hourly rate, depending on local rates and the job’s project complexity. Homes with multiple stories or steep pitches can add roughly 7% to 15% in accessibility-related labor cost.
Homes with steep pitch or complex architectural details around dormers, gables, and valleys also take longer to work around, adding to the total labor hours charged. When collecting quotes for Burke and surrounding areas homes, always confirm whether the estimate accounts for your home’s specific height and roofline configuration.
5. Gutter Removal and Reinstallation
In almost every fascia replacement project, the gutters must be removed to access the fascia boards, then reinstalled or replaced once the new boards are in place. Gutter removal and reinstallation typically adds $1 to $3 per linear foot to the project cost, which on a 200-linear-foot project means an additional $200 to $600. Labor to remove gutters and install new fascia often accounts for 60% to 70% of the total contractor invoice.
If your gutters are old, damaged, or were already performing poorly, this is an ideal time to replace them rather than reinstalling the existing system on fresh fascia, especially if damaged fasteners or loose screws also need replacement before the system can be reinstalled properly. New gutter installation costs $4 to $25 per linear foot depending on material and gutter size, with K-style aluminum gutters being the most common and affordable choice.

Signs Your Fascia Boards Need Replacement Now
Waiting too long to address deteriorating fascia turns a manageable repair into a much larger structural project. These are the signs that immediate replacement is warranted.
Visible Rot or Soft Spots
Press lightly against your fascia boards with a screwdriver or your fingertip at several points around your roofline. Healthy wood fascia is firm and solid. If the material gives, sinks, or crumbles under light pressure, rot has compromised the board’s structural integrity. A board that is soft to the touch cannot hold gutter weight or perform its protective function.
Peeling Paint With Discoloration
Peeling paint on fascia is not simply a cosmetic issue. It signals that moisture has been penetrating the board’s surface, which is how wood rot begins. Dark brown or black discoloration beneath peeling paint often indicates mold or early-stage rot that will spread if left unaddressed.
Gutters Pulling Away or Sagging
If your gutters are visibly pulling away from the roofline, tilting forward, or sagging between hangers, the fascia they’re attached to has lost structural integrity. This is a reliable external indicator of fascia failure even if you can’t easily access the boards directly.
Pest Evidence or Open Gaps
Holes, cracks, or gaps in fascia boards are entry points for insects, wasps, and small animals seeking the dark, sheltered space between the roof deck and soffit. Evidence of nesting activity or visible damage from woodpeckers is a sign that the fascia is both failing and already serving as a pest access point.
For a full breakdown of installed costs, lifespan, and maintenance by material, see the comparison table below.
Fascia Material Comparison: What Works Best in Northern Virginia
Choosing a material isn’t just about upfront price. It’s about the right balance of cost, performance, and maintenance for your specific climate and home style. Northern Virginia’s combination of humid summers, cold winters, freeze-thaw cycles, and occasional severe storms creates specific demands on roofline materials.
| Material | Cost Per Linear Foot (Installed) | Lifespan | Maintenance Level | Best For |
| Solid Wood | $5 to $10 | 15 to 20 years | High | Budget-conscious projects with regular upkeep |
| PVC or Vinyl | $7 to $14 | 25 to 30 years | Low | Low maintenance, moderate budget |
| Aluminum | $10 to $22 | 40 or more years | Very Low | Long-term durability, gutter stability |
| Fiber Cement | $10 to $20 | 40 or more years | Low | Maximum rot and pest resistance |
| Composite | $8 to $16 | 25 to 40 years | Low | Wood appearance with improved durability |
For most homes in Burke and surrounding areas, PVC or composite fascia represents the best value balance: meaningfully more durable than wood, significantly lower maintenance demand, and priced competitively enough that the upgrade from wood pays for itself within a few replacement cycles. Aluminum is the strongest choice for homes with heavy gutters or high exposure to moisture, particularly if the fascia is on a north-facing roofline that stays damp longer. Total cost can also rise if replacing fascia boards involves permit-required structural roofline work, with local fees sometimes running $50 to $300.
Solid wood remains a legitimate choice for homes in historic districts or HOA communities where material specifications are restricted, and it is often the cheaper upfront option compared with upgraded low-maintenance materials, but it requires a genuine commitment to regular painting and sealing on a two to four year cycle to protect it from moisture-related deterioration and achieve anything close to its rated lifespan in Virginia’s climate.
How to Replace Fascia Boards in 5 Steps
Replacing damaged fascia boards is an important maintenance task that protects your home from water damage and helps maintain its structural integrity. Properly caring for your fascia not only ensures the longevity of your roofing and drainage system but also improves the overall appearance of your home. Here is a step-by-step guide to help you replace fascia boards effectively.
1. Gather the Right Materials
Before starting the process, it is crucial to ensure you have all the necessary tools and materials at hand. This will save you time and make the workflow smoother. You will need a pry bar or hammer to remove the old fascia board, a measuring tape to get precise dimensions, and either a circular saw or hand saw to cut the replacement board to size. You should also have replacement fascia boards ready, along with primer and exterior-grade paint or stain to weatherproof the new board. Additionally, make sure you have a supply of galvanized nails or screws for securing the new fascia board. Safety gear such as gloves, goggles, and a sturdy ladder is essential to protect yourself while working at heights. Preparing these materials in advance will ensure that the project goes as smoothly as possible.
2. Remove the Damaged Fascia Board
The first hands-on step is to carefully remove the damaged fascia board. Start by detaching any gutters that may be attached to the board. You can do this by using a pry bar or hammer to loosen the fasteners holding the gutter system in place. Once the gutters are removed, gently pry off the old fascia board. Be cautious as you work to avoid damaging the nearby roofing materials or soffit. After removing the old board, take a moment to inspect the underlying area for any signs of damage. Look for decay in the adjacent wood, water infiltration issues, or mold growth. Addressing any underlying problems before installing the new fascia board is crucial to ensure a durable repair.
3. Measure and Cut the Replacement Board
With the old board removed, the next step is to measure and cut the replacement fascia board. Use a measuring tape to record the exact length and width of the original board. These measurements need to be accurate to ensure the new board fits perfectly without leaving gaps. Once you have precise measurements, cut the new board using a circular saw or hand saw. If you’re not experienced with cutting wood, take your time to ensure the edges are straight and clean. A properly-fitting fascia board is key to maintaining the structural integrity and appearance of your home.
4. Prime and Paint (Optional)
Before installing the new fascia board, you have the option to prime and paint or stain it. This step is highly recommended, as it helps protect the wood from weathering and moisture damage over time. Apply a primer first to create a strong base for the paint or stain. Then, follow up with two coats of durable exterior-grade paint or stain to ensure long-lasting protection. Be sure to allow each coat to dry fully before proceeding. This step is also an opportunity to match the finish to your home’s existing color scheme, creating a polished and cohesive look. Taking the time to weatherproof the board will prolong its lifespan and reduce the need for future maintenance.
5. Install the Replacement Fascia Board
Once the board is prepared, it’s time to install it. Position the new fascia board carefully against the structure, ensuring it lines up properly with the adjacent materials. Use galvanized nails or screws to securely fasten the board in place. Make sure the fasteners are evenly spaced and driven in firmly to prevent the board from shifting or coming loose over time. After the board is securely attached, reattach the gutters, ensuring they are properly aligned and securely fastened to the new fascia. Take care during this step, as improperly mounted gutters can cause water drainage issues. Once everything is in place, step back and inspect the finished work to ensure it looks neat and functions as intended.
Pro Tips for a Successful Fascia Board Replacement
Replacing fascia boards is crucial for preventing water damage, maintaining your home’s structural integrity, and improving its overall appearance. Proper installation also ensures your gutters function properly.
- Choose the right materials: Durable woods like cedar or redwood are great for longevity and resistance to decay, while PVC fascia boards offer a low-maintenance, weatherproof option that lasts for years. Consider your budget, climate, and desired look when selecting materials.
- Inspect for underlying damage: Before installation, carefully check for issues like mold, rot, or insect damage in the area. Addressing these problems first is essential to ensure the new fascia boards last and don’t mask deeper structural concerns.
- Call a professional if needed: Fascia board replacement requires precision, and mistakes can lead to costly repairs. If you’re inexperienced or unsure, certified roofing experts like Roof Troopers can handle the project efficiently and safely.

Get Your Fascia Assessment Right the First Time
Fascia board replacement is a project that rewards doing it once and doing it correctly. Choosing the right material for your home’s exposure conditions, addressing any underlying rafter damage fully, and reinstalling or upgrading gutters at the same time means you won’t be back on a ladder for this same repair for decades.
Roof Troopers serves homeowners throughout Northern Virginia, including Burke and surrounding areas. The team handles fascia inspection and soffit replacement as part of every roof evaluation, and we recommend hiring an experienced roofing company for this kind of work because these roofline components protect the structure and help support gutters safely, which means you get a complete picture of your roofline condition rather than a piecemeal assessment that misses what’s happening in the structure behind the boards. Every estimate is itemized and every recommendation is honest: if a repair rather than full replacement will serve the issue, Roof Troopers will tell you.
When you’re ready to find out exactly what your fascia situation looks like and what it will cost to address it properly, contact us today to schedule your free inspection. Roof Troopers will give you a clear answer and a fair price before any work begins, and you can also review the company website or request multiple quotes before you pay for the project. If widespread roof-edge damage is present, this work is often scheduled alongside a new roof. DIY replacing also calls for specialized tools and is rarely ideal beyond a very small, accessible repair.
FAQs
How much does fascia board replacement cost?
Fascia board replacement typically costs between $6 and $20 per linear foot depending on the material chosen, the extent of the damage, and local labor rates. In Northern Virginia, homeowners often pay toward the higher end of that range.
What is the cheapest fascia board material?
Wood is the most affordable option at $6 to $10 per linear foot. However, it requires regular painting or sealing to prevent rot, which adds to long-term maintenance costs. Vinyl and aluminum cost more upfront but tend to be more cost-effective over time.
When should you replace fascia boards instead of repairing them?
If the damage is limited to surface wear or a small section, a repair is usually sufficient. Full replacement is recommended when rot has spread along multiple sections, when gutters are pulling away from the board, or when the underlying wood structure has been compromised.
Don’t pay for your roof until 2027!
0% APR, same as cash for 24 months
Get Started Today!
"*" indicates required fields