Proper roof vent installation is a game-changer for your home. It improves ventilation, regulates indoor temperature, and extends the lifespan of your roof by preventing moisture buildup. While the process might seem intimidating, it’s completely doable if you follow the right steps. Whether you’re embarking on a DIY project or considering professional help, this guide will walk you through everything you need to know. What you’ll learn in this guide:
- Why roof vents are crucial for your home
- Step-by-step instructions for roof vent installation
- Tips for ensuring a safe and effective installation
🤔 Why Roof Vents are Essential

Roof vents are essential for maintaining the health and comfort of your home. They allow hot air and moisture to escape, helping to prevent problems such as mold growth, warped shingles, and higher energy bills. A properly installed roof vent improves energy efficiency, extends the lifespan of your roof, and enhances indoor air quality. Neglecting proper ventilation can lead to expensive repairs in the future, making it crucial to ensure your roof is well-ventilated.
Types of Roof Vents to Consider
Neglecting proper ventilation can lead to costly repairs, so choosing the right roof vent is key. Here are some common types to consider:
- Ridge vents: Installed along the roof’s peak for continuous airflow, ideal for warm climates.
- Box vents: Fixed vents over a cut-out hole, perfect for targeted ventilation.
- Soffit vents: Located under eaves, they work with roof vents to balance airflow.
- Turbine vents: Wind-powered vents that actively remove heat and moisture.
- Solar-powered vents: Eco-friendly vents that use solar energy to power a fan for efficiency.
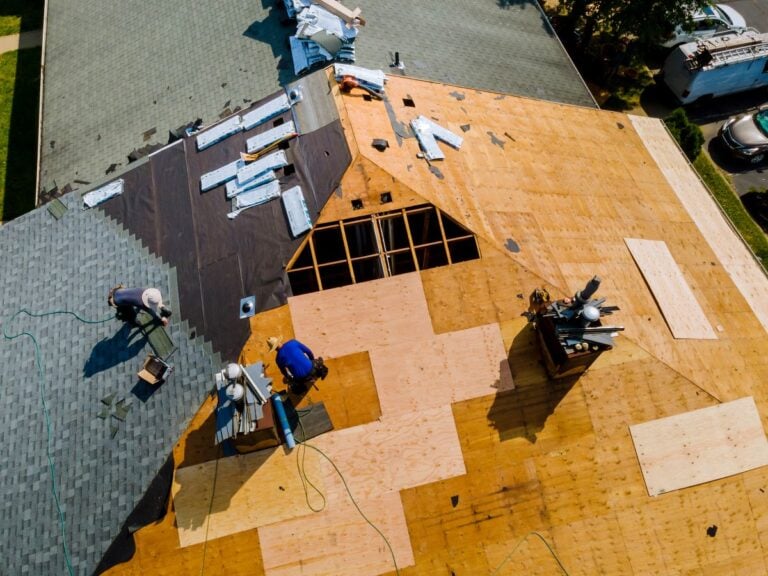
🧰 7 Steps to Install a Roof Vent

Installing a roof vent yourself can be a great way to improve the ventilation in your home while saving on professional costs. However, it’s important to approach the process with the right tools, preparation, and caution to ensure the installation is safe, efficient, and effective. This guide breaks the process down into 7 detailed steps to help you complete the task successfully.
1: Gather Your Tools and Materials
Before you start the installation process, it’s crucial to have all the necessary tools and materials on hand. This will save you time and ensure that the installation goes smoothly. You’ll need roof vents that are appropriate for your home’s ventilation needs, as well as roofing nails or screws to secure them in place. A hammer or drill will be required to attach the vent, while a quality roofing sealant will help create a waterproof seal around the vent. Additionally, you’ll need a tape measure to ensure accurate measurements, a utility knife and reciprocating saw to create the opening for the vent, and essential safety gear such as gloves, goggles, and a harness if you’re working at height. By gathering everything in advance, you’ll be better prepared for each step of the process.
2: Choose and Mark the Vent Location
The location of your roof vent plays a vital role in its effectiveness. Start by identifying the area on your roof where the vent will be installed. Ideally, the vent should be positioned centrally to maximize airflow and ventilation efficiency. Avoid placing the vent near structural beams or other obstructions that could interfere with the installation process. Once you’ve determined the ideal spot, use a piece of chalk to mark the area clearly. This marking will serve as your guide when cutting the opening, so take your time to ensure precision.
3: Cut the Vent Opening
With the location marked, the next step is to create an opening in your roof for the vent. Use a reciprocating saw to carefully cut an opening that matches the specifications of your chosen vent. It’s essential to cut accurately to avoid gaps or improper fitting. To ensure a snug and secure fit, make the hole slightly smaller than the vent flange. This will allow the vent to sit tightly when installed. Take care to follow all safety precautions during this step, as working with tools on a roof can be dangerous. Having someone nearby to assist or monitor can also enhance safety.
4: Install the Vent Base
Once the opening is ready, it’s time to install the base of the vent, also known as the flange. Start by applying a generous amount of roofing sealant around the edges of the opening. This sealant will create a watertight barrier, preventing leaks and ensuring the vent remains securely in place. Carefully position the vent base over the opening, pressing it firmly onto the sealant. Double-check that the base is aligned correctly and fully seals the edges of the cut opening. Taking your time with this step will prevent future issues, such as water damage or improper airflow.
5: Secure the Vent
With the base in place, you’ll need to secure it to the roof to ensure it remains stable and durable. Use roofing nails or screws to attach the vent base to the roof’s surface. Make sure the nails or screws are evenly spaced for maximum stability. Once the vent is secured, apply additional roofing sealant over all exposed nails or screws. This extra layer of sealant will protect your roof from potential leaks and further reinforce the vent’s attachment. Take a moment to inspect the vent base and confirm that everything is firmly in place before moving on to the next step.
6: Attach the Vent Cover
Many roof vents come with a separate cover that needs to be attached to the base. The cover serves as a protective shield, ensuring unobstructed airflow while keeping out debris, pests, and water. Follow the manufacturer’s instructions carefully to secure the cover to the base. Some covers may snap into place, while others require screws or additional fittings. Once the cover is attached, check that it is securely fastened and properly aligned. Ensure there are no obstructions or blockages that could interfere with airflow, as this could affect the vent’s performance.

7: Inspect and Test
The final step is to inspect your work and test the vent to ensure it’s functioning as intended. Carefully examine the vent and surrounding areas for gaps, loose fittings, or any signs of improper installation. Check that the sealant has been applied evenly and that there are no exposed areas where water could seep in. To test the vent’s performance, observe the airflow or use a moisture meter to check for improved ventilation in the space below. If you’ve installed multiple vents, ensure they’re evenly spaced and working together to provide balanced airflow throughout the roof. Taking the time to inspect and test your installation will give you peace of mind and ensure the longevity of your roof vent.
🦺 Safety and Maintenance Tips

Safety for any project is important. Roof vent installation is no different.
Prioritize Safety While Working on Your Roof
Safety should always come first when working on your roof. Make sure to wear the right safety gear, like a harness or slip-resistant shoes, to minimize the risk of accidents. Always ensure you have stable footing and use a sturdy ladder to access the roof. If you’re unsure about handling certain tasks, consider hiring a professional to avoid unnecessary risks.
Inspect and Maintain Your Roof Vents
Regular roof vent inspections are crucial for keeping them in good working condition. Look for blockages caused by dirt, debris, or leaves that could obstruct airflow. Check for visible signs of damage, such as cracks or leaks, which can reduce the vents’ efficiency and lead to further problems. Early detection of issues can save you time and money on costly repairs.
Clear Debris to Maintain Optimal Airflow
Keeping your roof and vents free of debris is essential for maintaining proper airflow. Regularly remove leaves, dirt, and other buildup that could clog vents or create drainage problems. This simple maintenance task not only ensures the efficiency of your roof system but also prevents potential structural issues caused by trapped moisture or weight from debris.
🛠️ Roof Vent Installation Guide
When it comes to roof vent installation, it’s essential to choose a team you can trust to get the job done right—and that’s exactly what we offer at Roof Troopers. With our expert knowledge, superior craftsmanship, and commitment to transparency, we go above and beyond to ensure your home is protected and your satisfaction is guaranteed.
Don’t leave something as important as your roof to chance. Contact Roof Troopers today for a consultation and experience the difference of working with true professionals. Let us help you create a safer, more efficient home!
Don’t pay for your roof until 2027!
0% APR, same as cash for 24 months
Get Started Today!
"*" indicates required fields